Translate

Showing posts with label VIOR'LA TAU. Show all posts

Saturday, January 28, 2017

Tau Vior'la (1.8a Developmental)Vs White Scars (NetEA Tournament Pack 2016)

Well we manage another game of epic. It was 3000 point per side and it was between White Scars (NetEA Tournament Pack 2016) and Tau Vior'la(1.8a Developmental)

I played the White Scars (NetEA Tournament Pack 2016) and Mathew played the Tau Vior'la (1.8a Developmental)…

********************************************************************************************************************

Armies used

White Scars (NetEA Tournament Pack 2016)
THUNDERHAWK [200]
THUNDERHAWK [200]
ASSAULT [225]
4 Assault Units, Chaplain
ASSAULT [225]
4 Assault Units, Chaplain
ASSAULT [225]
4 Assault Units, Chaplain
ASSAULT [225]
4 Assault Units, Chaplain
THUNDERBOLT FIGHTERS [175]
2 Fighters
STRIKE CRUISER [200]
THUNDERHAWK [200]
THUNDERHAWK [200]
ASSAULT [225]
4 Assault Units, Chaplain
ASSAULT [225]
4 Assault Units, Chaplain
ASSAULT [225]
4 Assault Units, Chaplain
ASSAULT [225]
4 Assault Units, Chaplain

Tau Vior'la(1.8a Developmental)
XV104 RIPTIDE FORMATION [525]4 XV104 Riptides, Shas'o Commander
XV104 RIPTIDE FORMATION [350]3 XV104 Riptides, Shas'el Commander
KX 139 TA'UNAR SUPREMACY [225]1 KX 139 Ta'unar Supremacy
FIRE WARRIOR CADRE [350]6 Fire Warrior Units, 3 Devilfishes, Skyray,
FIRE WARRIOR CADRE [225]6 Fire Warrior Units, 3 Devilfishes
STEALTH GROUP [250]6 XV15 Stealth Units,
TIGER SHARK AX-1-0 [175]1 Tiger Shark AX-1-0
BARRACUDA SQUADRON [150]2 Barracuda Fighters
SPACECRAFT [200]1 Protector Class Cruiser

*********************************************************************************************************************

Deployment

Sorry no deployment shot…someone forgot to start the log file….

********************************************************************************************************************

Turn 1

  • White Scars- win the SR and goes first..
  • White Scars- bring on STRIKE CRUISER and do orbital bombardment and manage to hit the XV104 RIPTIDE FORMATION (SC) and the FIRE WARRIOR CADRE. The XV104 RIPTIDE FORMATION (SC), suffer a DC and get 2BM’s.The FIRE WARRIOR CADRE is wipe from the board, its one with the skyray.
  • White Scars- Bring on THUNDERHAWK&2 ASSAULT formation and engage the XV104 RIPTIDE FORMATION (SC).The XV104 RIPTIDE FORMATION (SC) gets support from KX 139 TA'UNAR SUPREMACY. The dice are rolled and the THUNDERHAWK&2 ASSAULT formation (BM to one formation) wins the combat and the XV104 RIPTIDE FORMATION (SC) is wiped from the board. The KX 139 TA'UNAR SUPREMACY gets a BM for supporting failed assault..
  • Tau Vior’la- Place BARRACUDA SQUADRON on CAP…
  • Tau Vior’la- Fail to place BARRACUDA SQUADRON on CAP…
  • White Scars- Fail to bring in THUNDERBOLT FIGHTERS
  • Tau Vior’la—Move FIRE WARRIOR CADRE and shooting assaults formation in open, Killing 1 and giving it 2BM’S..
  • Tau Vior’la- Fail to activate The XV104 RIPTIDE FORMATION and so regroups..
  • White Scars- Bring on THUNDERHAWK (BM from CAP) &2 ASSAULT formation and engage the FIRE WARRIOR CADRE FORMATION. The FIRE WARRIOR CADRE FORMATION gets support from KX 139 TA'UNAR SUPREMACY. The THUNDERHAWK &2 ASSAULT formations, get support from THUNDERHAWK &2 ASSAULT. The dice are rolled and the THUNDERHAWK&2 ASSAULT formation (BM to one formation) wins the combat and the FIRE WARRIOR CADRE FORMATION is wiped from the board. The KX 139 TA'UNAR SUPREMACY gets a BM for supporting failed assault..
  • White Scars- Bring on THUNDERHAWK&2 ASSAULT formation and engage the XV104 RIPTIDE FORMATION .The XV104 RIPTIDE FORMATION gets support from KX 139 TA'UNAR SUPREMACY. The dice are rolled and the THUNDERHAWK&2 ASSAULT formation (BM to one formation) wins the combat and the XV104 RIPTIDE FORMATION is wiped from the board. The KX 139 TA'UNAR SUPREMACY gets a BM for supporting failed assault
  • Tau Vior’la- Bring on AX10 and shoots Thunder hawk, doing a DC and confirming a Critical. This destroys the Thunder hawk…
  • White Scars- BRING THUINDER HAWK AND SHOOTS KX139 TA'UNAR SUPREMACY, doing a DC and breaking it due to BM’s and so it flees forwards….
  • Tau Vior’la- Do sustains fire with KX139 TA'UNAR SUPREMACY, and targets the Assault formation in ruins and manages to clip the other assault formation. Killing 2 and giving 3 BM’s to one assaults formation and a BM to one that was clipped…
  • White Scars- Double move assaults marines on the right flank up to claim objective marker..
  • Tau Vior’la- Do sustains fire with KX139 TA'UNAR SUPREMACY, and targets the Assault formation in ruins and Killing 2 and giving 3 BM’s..
  • White Scars- place Assaults on overwatch, to cover Blitz..

    Rally phase.

  • White Scars- rally every thing
  • Tau Vior’la- Don’t rally KX 139 TA'UNAR SUPREMACY
  • No AC were lost in the disengage section..

    END OF TURN SHOT

    End of turn 1

    ********************************************************************************************************************

    Turn 2

  • Tau Vior’la- Does teleports and brings in STEALTH GROUP..

    teleporting

    • White Scars- win the SR and goes first..
    • White Scars- Do engage action with assaults formation and engages the KX 139 TA'UNAR SUPREMACY. The dice are rolled and the assaults win the combat. The KX 139 TA'UNAR SUPREMACY is wiped from the board.
    • White Scars- Retain, Do engage action with assaults and engages the KX 139 TA'UNAR SUPREMACY. The dice are rolled and the assaults win the combat. The KX 139 TA'UNAR SUPREMACY is wiped from the board.
    • Tau Vior’la- Do a marshal action with STEALTH GROUP. So move and remove all BM’s
    • White Scars- bring on thunder hawk and shoots broken KV139 TA'UNAR SUPREMACY, doing a DC and killing it out right with nice critical..
    • White Scars- Double move assaults, and capture a Objective marker..
    • Tau Vior’la- Bring on BARRACUDA SQUADRON and shoots Assaults, near Blitz. Giving them a BM..
    • Tau Vior’la- Bring on BARRACUDA SQUADRON and shoots Assaults, near Blitz. Giving them a BM
    • White Scars- Move assaults towards Tau Blitz.
    • Tau Vior’la- - Bring on AX10 and shoots Assaults, near Blitz. Giving them a BM
    • White Scars- assaults match move, but fail their DDT and so the formation is wiped from the board..
    • Tau Vior’la- Activate the Protector Class Cruiser. Lots of spacey noises, while fly’s around..
    • White Scars- Bring on thunderbolts and shoots the AX10, blowing it out of the sky…
    • White Scars- Place assaults on overwatch, to cover Objective marker on right flank.
    • White Scars- Do a Marshalling action with Assaults, so move and then remove all BM’s
    • White Scars-Bring on thunder hawk and will shoot stealth group, giving it a BM
    • White Scars-Bring on thunder hawk and will shoot stealth group, Killing 1 and giving it 2 BM’s
    • White Scars- keep Assaults on overwatch..

    Rally Phase

    • Tau Vior’la- Do remove BM’s from stealth's
    • No AC were lost in the disengage section..
    • The Tau Vior'la conceded and the White Scars win 5-1
       
    Victory Condition Tau Vior'la White Scars
    1. Blitz NO Yes
    2. Break their sprit Yes Yes
    3. Defend the Flag NO Yes
    4. Take and Hold No Yes
    5. They Shall not Pass NO Yes
    END OF TURN SHOT

     end of turn 2

    ********************************************************************************************************************

    Summary
     
    Thanks for the fun game Mathew…The white scar list is not one you will see at a comp, but it makes for interesting game..

    I was lucky in getting first turn and then having the Orbital barrage do some damage…and then follow it up with some nice Assaults…

    May the dice roll high for you…

    Regards

    Greg

  • Tau Vior'la(1.8a Developmental)Vs Ork Gargant Big Mob 3.4

    Well we manage another game of epic. It was 3000 point per side and it was between Ork Gargant Big Mob 3.4 Vs Tau Vior'la(1.8a Developmental)

    Mathew played the Tau Vior'la(1.8a Developmental) and I played the Ork Gargant Big Mob 3.4

    ********************************************************************************************************************

    Armies used

    Ork Gargant Big Mob
    GREAT GARGANT [800]2 Soopa Zzap Gun, Mega Lobba, Mekboy Big Boss
    GREAT GARGANT [775]2 Soopa Zzap Gun, Gatling Kannon
    GARGANT [650]2 Soopagun, Grot Guided Missile
    SUPA STOMPA [325]3 Soopagun, (Kustom) Extra Armour Bitz
    LOOTA WARBAND (NORMAL) [150]6 Boyz, 2 Grotz, Big Gunz
    FIGHTA-BOMMERS [150]3 Fighta-Bommers
    FIGHTA-BOMMERS [150]3 Fighta-Bommers

    ORK

    Tau Vior'la(1.8a Developmental)
    XV104 RIPTIDE FORMATION [525]4 XV104 Riptides, Shas'o Commander
    XV104 RIPTIDE FORMATION [350]3 XV104 Riptides, Shas'el Commander
    KX 139 TA'UNAR SUPREMACY [225]1 KX 139 Ta'unar Supremacy
    KX 139 TA'UNAR SUPREMACY [225]1 KX 139 Ta'unar Supremacy
    KX 139 TA'UNAR SUPREMACY [225]1 KX 139 Ta'unar Supremacy
    FIRE WARRIOR CADRE [350]6 Fire Warrior Units, 3 Devilfishes, Skyray,Cadre Fireblade
    FIRE WARRIOR CADRE [225]6 Fire Warrior Units, 3 Devilfishes
    SUN SHARK SQUADRON [200] 2 Sun Shark Bombers
    TIGER SHARK AX-1-0 [175]1 Tiger Shark AX-1-0
    BARRACUDA SQUADRON [150]2 Barracuda Fighters
    BARRACUDA SQUADRON [150]2 Barracuda Fighters
    SPACECRAFT [200]1 Protector Class Cruiser

    *********************************************************************************************************************

    Deployment

      SORRY NO Deployment SHOOT..SOMEONE FOR GOT TO START THE LOG FILE..Open-mouthed smile

    ********************************************************************************************************************

    Turn 1

    • Ork Gargant Big Mob- Wins SR and goes first..
    • Ork Gargant Big Mob- Do sustains fire with GARGANT and shoots KX 139 Ta'unar Supremacy next building. Does 1DC and destroys the formation due to Critical..
    • Ork Gargant Big Mob- Retain and bring in FIGHTA-BOMMERS and shoots KX 139 Ta'unar Supremacy on the left flank, doing a DC and giving it 2 BM’s
    • Tau Vior’la(1.8a Developmental) – Do sustain fire with left KX 139 Ta'unar Supremacy at GARGANT, taking down a power field..
    • Tau Vior’la(1.8a Developmental) - Do sustain fire with right KX 139 Ta'unar Supremacy at Great GARGANT(SC), taking down a 5 power fields..
    • Ork Gargant Big Mob- Double moves SUPA STOMPA up their right flank.
    • Tau Vior’la(1.8a Developmental) – Double move left XV104 RIPTIDE FORMATION and shoots SUPA STOMPA, giving it a BM..
    • Ork Gargant Big Mob- Double move Great GARGANT (SC), up, behind woods..
    • Tau Vior’la(1.8a Developmental) –March move right XV104 RIPTIDE FORMATION up behind church..
    • Ork Gargant Big Mob- Double move Great GARGANT up,
    • Tau Vior’la(1.8a Developmental) – Bring on TIGER SHARK AX-1-0 and is jumped by CAP and is shot out of the sky..
    • Ork Gargant Big Mob- Fail to activate the LOOTA WARBAND (NORMAL)…and so regroup..
    • Tau Vior’la(1.8a Developmental) - BARRACUDA SQUADRON(1K/2BM FROM AA fire) comes in and shoots the FIGHTA-BOMMERS...Killing 1 FB and giving it 2 BM’s
    • Tau Vior’la(1.8a Developmental) - BARRACUDA SQUADRON comes in and shoots the FIGHTA-BOMMERS...Killing 1 FB and giving it 2 BM’s
    • Tau Vior’la(1.8a Developmental) – March the Right FIRE WARRIOR CADRE up ‘right flank.
    • Tau Vior’la(1.8a Developmental) – Double move FIRE WARRIOR CADRE up behind church roughly..
    • Tau Vior’la(1.8a Developmental) – Bring on SUN SHARK SQUADRON and target the Great GARGANT (SC), taking a power field down and giving it a BM..

    RALLY PHASE:

    • Ork Gargant Big Mob- Rally all formations..
    • Tau Vior’la(1.8a Developmental) – Rally all formations.
    • No AC were shot down in the disengage section..

    END OF TURN SHOT

    SORRY NO END OF TURN SHOOT..SOMEONE FOR GOT TO START THE LOG FILE..Confused smile

    ********************************************************************************************************************

    Turn 2

    • Ork Gargant Big Mob- Win SR and go first..
    • Ork Gargant Big Mob- Double move Great GARGANT (SC), and shoots FIRE WARRIOR CADRE. Killing 4 and breaking it due to BM’s and so it flees back, so it’s in front of the church…
    • Ork Gargant Big Mob- Retain double move down road with Great GARGANT and shoot FIRE WARRIOR CADRE, giving it a BM…
    • Tau Vior’la(1.8a Developmental) – Move right XV104 RIPTIDE FORMATION to move and shoot Great GARGANT (SC), Taking a last power field down and taking 2 DC and 3BM and 1 fire from critical.
    • Ork Gargant Big Mob- Do sustains fire with GARGANT and shoots KX 139 Ta'unar Supremacy on left, killing it out right.
    • Tau Vior’la(1.8a Developmental) – Bring on Protector Class Cruiser and do Pin point attacks at the Great GARGANT (SC), do 5 DC and giving it 6 BM’s and 1 fire from critical.
    • Ork Gargant Big Mob- Double move SUPA STOMPA and shoot XV104 RIPTIDE FORMATION, giving it 2 BM’s
    • Tau Vior’la(1.8a Developmental) - Bring on SUN SHARK SQUADRON and target GARGANT, taking down 2 power shield and a BM…
    • Ork Gargant Big Mob- Fail to Bring on FIGHTA-BOMMERS…
    • Tau Vior’la(1.8a Developmental) –Fail to activate KX 139 Ta'unar Supremacy and so regroup..
    • Ork Gargant Big Mob- Bring on FIGHTA-BOMMERS and shoots the KX 139 Ta'unar Supremacy, giving it a BM..
    • Tau Vior’la(1.8a Developmental) – Move the left XV104 RIPTIDE FORMATION and shoots SUPA STOMPA, taking down all remaining Power fields and doing 3DC and giving it 4BM’s and doing 1 Fire.
    • Ork Gargant Big Mob- Fail to activate LOOTA WARBAND (NORMAL) and so regroup..
    • Tau Vior’la(1.8a Developmental) –March move FIRE WARRIOR CADRE….
    • Tau Vior’la(1.8a Developmental) - BARRACUDA SQUADRON comes in and shoots the FIGHTA-BOMMERS... giving it a BM.
    • Tau Vior’la(1.8a Developmental) - BARRACUDA SQUADRON comes in and shoots the FIGHTA-BOMMERS... giving it a BM.

    RALLY PHASE..

    • Ork Gargant Big Mob- Roll for Fires on Great GARGANT (SC), putting 1 out and keeping one. The SUPA STOMPA keep their fire.
    • Ork Gargant Big Mob- Rally all formations again..
    • Tau Vior’la(1.8a Developmental) – Don’t rally FIRE WARRIOR CADRE.
    • No AC were lost in the disengage section..

    END OF TURN SHOT

    SORRY NO END OF TURN SHOOT..SOMEONE FOR GOT TO START THE LOG FILE..

    ********************************************************************************************************************

    Turn 3

    • Ork Gargant Big Mob- Win SR and goes first..
    • Ork Gargant Big Mob- Double move Great GARGANT and shoot FIRE WARRIOR CADRE, killing three and giving it 4 BM’s
    • Ork Gargant Big Mob- Fail to activate Great GARGANT (SC)(SC reroll used) and so shoots the XV104 RIPTIDE FORMATION, giving it 2 BM’s..
    • Tau Vior’la(1.8a Developmental) – Move left XV104 RIPTIDE FORMATION and shoot SUPA STOMPA, doing a 2DC A and killing it out right..
    • Ork Gargant Big Mob- Bring on FIGHTA-BOMMERS and shoot KX 139 Ta'unar Supremacy, giving it a BM..
    • Tau Vior’la(1.8a Developmental) –Do sustain fire with right side XV104 RIPTIDE FORMATION and shoots the Great GARGANT (SC), doing 2 DC and giving it 3 BM’s
    • Ork Gargant Big Mob- March move GARGANT up..
    • Tau Vior’la(1.8a Developmental) – Do marshalling order on FIRE WARRIOR CADRE, so move and remove BM’s
    • Ork Gargant Big Mob-Place LOOTA WARBAND (NORMAL) on overwatch near Blitz
    • Tau Vior’la(1.8a Developmental) - Bring on SUN SHARK SQUADRON and target the LOOTA WARBAND (NORMAL), giving it a BM..
    • Ork Gargant Big Mob- Fail to Bring on FIGHTA-BOMMERS…
    • Tau Vior’la(1.8a Developmental) - Do sustain fire with right KX 139 Ta'unar Supremacy at Great GARGANT(SC), doing a DC and giving it 2BM’s
    • Tau Vior’la(1.8a Developmental) - BARRACUDA SQUADRON comes in and shoots the Great GARGANT(SC), doing a DC and giving it 2BM’s
    • Tau Vior’la(1.8a Developmental) - BARRACUDA SQUADRON comes in and shoots the Great GARGANT(SC), giving it a BM..

    Rally Phase:

    • Ork Gargant Big Mob- Roll for Fires on Great GARGANT (SC), not putting the fire out and falling over since it suffered another DC(BTS)
    • Ork Gargant Big Mob- Rally all formations again..
    • Tau Vior’la(1.8a Developmental) – Don’t rally FIRE WARRIOR CADRE(SC rerolled used) and the KX 139 Ta'unar Supremacy didn’t remove BM’s.
    • No AC were lost in the disengage section..

    END OF TURN SHOT

    end of turn 3 

    ********************************************************************************************************************

    Turn 4

    • Tau Vior’la(1.8a Developmental) – Win SR and goes first..
    • Tau Vior’la(1.8a Developmental) – March move FIRE WARRIOR CADRE behind woods..
    • Tau Vior’la(1.8a Developmental) –Move right XV104 RIPTIDE FORMATION(SC rerolled used) and shoot GARGANT, taking three power fields down and giving it a BM..
    • Ork Gargant Big Mob- Bring in FIGHTA-BOMMERS and shoots the KX 139 Ta'unar Supremacy, giving it a BM.
    • Tau Vior’la(1.8a Developmental) – Fail to activate KX 139 Ta'unar Supremacy, and so it breaks due to BM’s
    • Ork Gargant Big Mob- Double move Gargant and shoot XV104 RIPTIDE FORMATION, killing the leader with a critical + 1 DC and breaking it due to BM’s…So it flees back behind woods.
    • Tau Vior’la(1.8a Developmental) – Fails to bring on SUN SHARK SQUADRON.
    • Ork Gargant Big Mob- Bring FIGHTA-BOMMERS and shoots the broken KX 139 Ta'unar Supremacy, doing a DC all up...
    • Tau Vior’la(1.8a Developmental) – Fail to bring on BARRACUDA SQUADRON
    • Ork Gargant Big Mob- Fail to activate great Gargant and so regroup..
    • Tau Vior’la(1.8a Developmental) - BARRACUDA SQUADRON comes in and shoots the FIGHTA-BOMMERS... killing the last one in the formation...
    • Ork Gargant Big Mob- Double move LOOTA WARBAND (NORMAL) and claim to objective markers..
    • Tau Vior’la(1.8a Developmental) – March Move XV104 RIPTIDE FORMATION and contest an objective marker..

    RALLY PHASE:

    • Ork Gargant Big Mob- Don’t removes BMs from Gargant
    • Tau Vior’la(1.8a Developmental) – Don’t rally FIRE WARRIOR CADRE
    • No AC were lost in the disengage section..
    • Tau Vior'la win on count back 925 to 1600
       
    Victory Condition Tau Vior'la Ork Gargant Big Mob
    1. Blitz NO no
    2. Break their sprit Yes NO
    3. Defend the Flag NO no
    4. Take and Hold No no
    5. They Shall not Pass NO no
    END OF TURN SHOT

    End of turn 4 

    ********************************************************************************************************************

    Summary
     
    Thanks for the game Mathew.. Very interest Ork Gargant Big Mob list you did up and it was enjoyable to use and play with..Oh they tough, but breakable……
     
    Regards
    Greg

    Saturday, November 26, 2016

    Tau Vior'la (1.8a Developmental)V’sBiel-Tan Craftworld (Biel-Tan Craftworld (v4.2))

    Well we manage another game of epic. It was 3000 point per side and it was between Biel-Tan Craftworld (Biel-Tan Craftworld (v4.2)) and Tau Vior'la(1.8a Developmental)

    I played the Biel-Tan Craftworld (Biel-Tan Craftworld (v4.2)) and Mathew played the Tau Vior'la (1.8a Developmental)…

    ********************************************************************************************************************

    Armies used

    Tau Vior'la (1.8a Developmental)

    FIRE WARRIOR CADRE [425]
    6 Fire Warrior Units, 3 Devilfishes, Shas'o Commander, Cadre Fireblade, Skyray

    FIRE WARRIOR CADRE [500]
    6 Fire Warrior Units, 3 Devilfishes, 2 Pathfinder units and 1 Devilfish or 3 pathfinder units, Cadre Fireblade, Ethereal, Skyray

    FIRE WARRIOR CADRE [250]
    6 Fire Warrior Units, 3 Devilfishes, Cadre Fireblade

    ARMOURED SUPPORT GROUP [225]
    4 Hammerhead Gunship (Railhead)

    ARMOURED SUPPORT GROUP [225]
    4 Hammerhead Gunship (Railhead)

    ARMOURED SUPPORT GROUP [225]
    4 Hammerhead Gunship (Railhead)

    RECON SKIMMER GROUP [150]
    Piranha, 4 Pathfinder Tetra

    RECON SKIMMER GROUP [150]
    5 Pathfinder Tetra

    RECON SKIMMER GROUP [150]
    5 Pathfinder Tetra

    RECON SKIMMER GROUP [150]
    5 Pathfinder Tetra

    XV104 RIPTIDE FORMATION [350]
    3 XV104 Riptides, Shas'el Commander

    SPACECRAFT [200]
    1 Protector Class Cruiser

    Biel-Tan Craftworld (Biel-Tan Craftworld (v4.2))

    ASPECT WARRIOR WARHOST [400]8 Shining Spear, Autarch, Exarch

    ASPECT WARRIOR WARHOST [350]8 Shining Spear, 2 Exarch

    ASPECT WARRIOR WARHOST [350]8 Swooping Hawk, 2 Exarch

    ENGINE OF VAUL TROUPE [250]Scorpion

    ENGINE OF VAUL TROUPE [250]Scorpion

    VOID SPINNER [275]Void Spinner

    VOID SPINNER [275]Void Spinner

    RANGER TROUPE [100]4 Ranger

    SWORDS OF VAUL TROUPE [250]3 Falcon, 2 Fire Storm

    SWORDS OF VAUL TROUPE [250]3 Falcon, 2 Fire Storm

    SWORDS OF VAUL TROUPE [250]3 Falcon, 2 Fire Storm

    *********************************************************************************************************************

    Deployment

     Deployment

    ********************************************************************************************************************

    Turn 1

    • Biel-Tan Craftworld- Win SR and go first..
    • Biel-Tan Craftworld- Does sustain fire with void spinner and shoots FIRE WARRIOR CADRE, killing 4 and breaking the formation and so it flees..
    • Biel-Tan Craftworld- Retain Does sustain fire with void spinner and shoots broken FIRE WARRIOR CADRE, wiping the formation out (SC rerolled used).
    • Tau Vior’la- Does coordinate fire with RECON SKIMMER GROUP (Gold) with ARMOURED SUPPORT GROUP. So RECON SKIMMER GROUP (Gold) double move and shoot EoV, giving it a BM. The ARMOURED SUPPORT GROUP double moves and shoots EoV, Doing a DC and breaking the formation which Flees forwards..
    • Tau Vior’la-Retain and activate Protector Class Cruiser. Fires it’s two point attacks at the void spinners. So first one is rolled, and hit, does 1DC and is destroyed due to critical. The second hits and is killed outright..
    • Biel-Tan Craftworld- Does a engage action with Shinning spears and targets RECON SKIMMER GROUP (Gold).The dice are rolled and the Shinning spears win and the RECON SKIMMER GROUP (Gold) is wiped from the board. The shinning spears consolidate behind woods..
    • Biel-Tan Craftworld- Retain, so move EoV up and shoot ARMOURED SUPPORT GROUP, killing 1 and giving it 2 BM’s and moves back..
    • Tau Vior’la- Double move RECON SKIMMER GROUP (black) and Broken EoV, killing it out right
    • Biel-Tan Craftworld- Fail to activate SoV near Blitz and so regroups..
    • Tau Vior’la- March move ARMOURED SUPPORT GROUP up..
    • Biel-Tan Craftworld- Double move SoV and shoot ARMOURED SUPPORT GROUP, killing 1 and breaking the formation and so it flees.
    • Tau Vior’la- March move FIRE WARRIOR CADRE (SC) up..
    • Biel-Tan Craftworld- March move SoV up right flank..
    • Tau Vior’la- March move RECON SKIMMER GROUP (red), to guard his blitz
    • Biel-Tan Craftworld- March move rangers
    • Tau Vior’la- March move ARMOURED SUPPORT GROUP over to Blitz, to help guard it..
    • Biel-Tan Craftworld- March move shinning spears..
    • Tau Vior’la- March move FIRE WARRIOR CADRE (SC) up..
    • Tau Vior’la- March move RECON SKIMMER GROUP (green),up..

    Rally Phase

    • Tau Vior’la- Fail to rally ARMOURED SUPPORT GROUP

    END OF TURN SHOT

    end of turn1

    ********************************************************************************************************************

    Turn 2

    • Tau Vior’la – Win SR and goes first..
    • Tau Vior’la- Tau Vior’la- Does coordinate fire with RECON SKIMMER GROUP (Black) with FIRE WARRIOR CADRE. So RECON SKIMMER GROUP (Black) moves and shoots Shinning spears, giving it a BM. The FIRE WARRIOR CADRE moves and shoots Shinning spears, Killing 6 and breaking the formation. Which flees down the base line..
    • Tau Vior’la- Double move FIRE WARRIOR CADRE (BTS) and shoots shinning spears, killing 1 and giving it 3 BM’s
    • Biel-Tan Craftworld- Do pop with SoV near Blitz and FIRE WARRIOR CADRE, killing 3 AV’s and giving it 4 BM’s
    • Biel-Tan Craftworld- Retain and do an engage action with Shinning spears and targets RECON SKIMMER GROUP (Black) and call intermingled and drag in FIRE WARRIOR CADRE. The dice are rolled and the RECON SKIMMER GROUP (Black)& FIRE WARRIOR CADRE win the combat and the Shinning spears are broken and flee down the base line…lost by a pip.
    • Tau Vior’la- Double move RECON SKIMMER GROUP (Green) and shoots Broken Shinning spear wiping it from the board…
    • Tau Vior’la- Retain and double move XV104 RIPTIDE FORMATION and shoots Broken shinning spears, wiping them from the board..
    • Biel-Tan Craftworld- Does Pop up attack with EOV and shoot XV104 RIPTIDE FORMATION, doing a DC and giving it 2 BM’s
    • Biel-Tan Craftworld- Retain and does pop up with SoV and shoot XV104 RIPTIDE FORMATION, killing a W/E and breaking the formation, which flees forwards..
    • Tau Vior’la- Fail to activate ARMOURED SUPPORT GROUP, so take BM and shoots SoV near Blitz, giving it a BM..
    • Biel-Tan Craftworld- Fail to activate SoV and so regroups..
    • Tau Vior’la- Fail to activate RECON SKIMMER GROUP (red)(SC rerolled used) and so regroups..
    • Biel-Tan Craftworld- Double move Rangers and shoots FIRE WARRIOR CADRE, giving it a BM and breaking it, so it flees..
    • Tau Vior’la- Double move ARMOURED SUPPORT GROUP, and shoots Rangers, giving them a BM..

    Rally Phase

    • Biel-Tan Craftworld- Don’t remove BM’s from Rangers.
    • Tau Vior’la- Don’t rally ARMOURED SUPPORT GROUP, FIRE WARRIOR CADRE(SC) and XV104 RIPTIDE FORMATION,

    END OF TURN SHOT
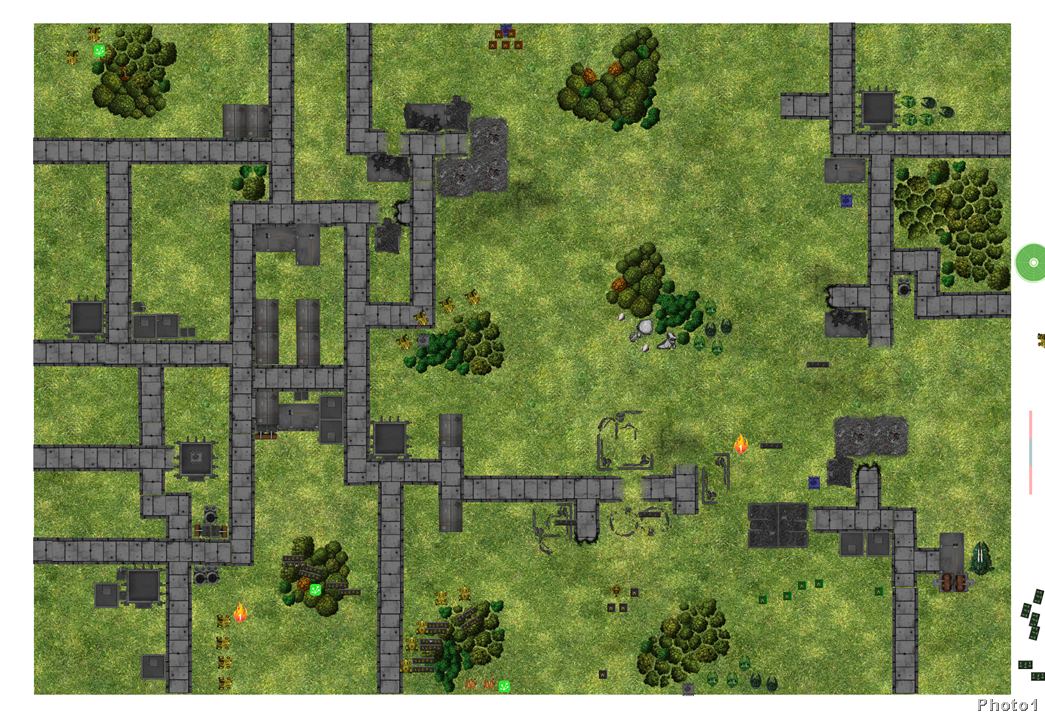
    end of turn 2

    ********************************************************************************************************************

    Turn 3

    • Biel-Tan Craftworld- Teleport in ASPECT WARRIOR WARHOST (Swooping Hawks), 1 BM for teleporting..
    • Biel-Tan Craftworld- Win SR and goes First (Both sides rolling a 1 on the die)
    • Biel-Tan Craftworld- Do Pop up attack with SoV and shoots broken XV104 RIPTIDE FORMATION, Killing one W/E and wiping the formation out..
    • Biel-Tan Craftworld- Retain and fails to activate ASPECT WARRIOR WARHOST (Swooping Hawks), and so regroups..
    • Tau Vior’la- Double move FIRE WARRIOR CADRE (BTS) and shoots Rangers, killing 2 and breaking it and so it flees forwards
    • Biel-Tan Craftworld- Move SoV and shoot ARMOURED SUPPORT GROUP, killing 2 and breaking the formation, which flees.
    • Tau Vior’la- Move ARMOURED SUPPORT GROUP, and shoots SoV near Blitz, giving it a BM
    • Tau Vior’la- Retain and moves RECON SKIMMER GROUP (Green) and shoot SoV, giving it a BM
    • Biel-Tan Craftworld-Double move SoV and shoots RECON SKIMMER GROUP (Red), Killing 1 and giving it 2 BM’s
    • Tau Vior’la- Moves RECON SKIMMER GROUP and shoot SoV, giving it a BM
    • Biel-Tan Craftworld- Do pop up attack with EoV and shoot RECON SKIMMER GROUP near my blitz, killing 2 and breaking it, so it flees,
    • Tau Vior’la- Marshal RECON SKIMMER GROUP(Red), so move and remove all BM’s

    Rally Phase:

    • Biel-Tan Craftworld- Don’t rally Ranger and don’t remove BM’s off SoV
    • Tau Vior’la- Don’t rally FIRE WARRIOR CADRE (SC), 2X ARMOURED SUPPORT GROUP, RECON SKIMMER GROUP and don’t remove BM’s from RECON SKIMMER GROUP(Green)

    END OF TURN SHOT

    End of turn 3

    ********************************************************************************************************************

    Turn 4

    • Biel-Tan Craftworld- Win SR and goes first..
    • Biel-Tan Craftworld- Do engagement with swooping hawks and target RECON SKIMMER GROUP(Red),The dice are rolled and the swooping hawks win and the RECON SKIMMER GROUP(Red) is wiped from the board. The swooping hawks consolidate a full move to claim Blitz..
    • Biel-Tan Craftworld- Retain and Move SoV and shoot FIRE WARRIOR CADRE, killing 3 and giving it 4 BM’s
    • Tau Vior’la- Fail to activate RECON SKIMMER GROUP(Green), takes BM and shoots SoV, giving it a BM and breaking it, so it flees.
    • Biel-Tan Craftworld- Do pop up attack with EoV and shoots RECON SKIMMER GROUP(Green), killing two and breaking it, so it flees.
    • Tau Vior’la- Marshal FIRE WARRIOR CADRE(BTS) and so moves and removes all BM’s
    • Biel-Tan Craftworld- Fail to activate SoV, so takes BM and shoots FIRE WARRIOR CADRE(BTS), giving them a BM
    • Tau Vior’la- March move ARMOURED SUPPORT GROUP up and claim the Blitz and TAH..

    Rally Phase:

    • Biel-Tan Craftworld- Don’t rally SoV
    • Tau Vior’la- Don’t rally ARMOURED SUPPORT GROUP and RECON SKIMMER GROUP..
    Victory Condition Biel-Tan Craftworld Tau Vior'la (1.8a Developmental)
    1. Blitz Yes Yes
    2. Break their sprit NO Yes
    3. Defend the Flag NO no
    4. Take and Hold No Yes
    5. They Shall not Pass NO no
    END OF TURN SHOT

    End of turn 4 

    ********************************************************************************************************************

    Summary
     
     Wow that was a bloody game..I need to get SR on turn 2, but I didn't..It came down to a Dice roll I guess, in that I need to activate my SoV and shoot the ARMOURED SUPPORT GROUP and pray that I broke the formation and when checking want was killed, the Tau Vior’la were in front(1463 to 1725)..So would have lost the game on count back..Bloody spaceship..
     
    Thanks Mathew for another fun game..
     
    Regards
    Greg

    Friday, November 18, 2016

    Codex Astartes (NetEA Tournament Pack 2014) Vs Tau Vior'la (1.5 Developmental)

    Well we manage another game of epic. It was 3000 point per side and it was between Codex Astartes (NetEA Tournament Pack 2014) and Tau Vior'la (1.5 Developmental)

    I played the Codex Astartes (NetEA Tournament Pack 2014) and Mathew played the Tau Vior'la (1.5 Developmental)

    ********************************************************************************************************************

    Armies used

    Codex Astartes (NetEA Tournament Pack 2014)
    SCOUT [250]
    4 Scouts, 4 Snipers, Rhinos, Chaplain
    SCOUT [200]
    4 Scouts, 4 Snipers, Rhinos
    THUNDERHAWK [200]
    THUNDERHAWK [200]
    DEVASTATOR [300]
    4 Devastators, Chaplain
    DEVASTATOR [300]
    4 Devastators, Chaplain
    DEVASTATOR [300]
    4 Devastators, Chaplain
    DEVASTATOR [300]
    4 Devastators, Chaplain
    TACTICAL [400]
    6 Tacticals, Chaplain, Hunter
    LAND RAIDER [375]
    4 Land Raiders, Chaplain
    THUNDERBOLT SQUADRON [175]
    2 Thunderbolt Fighters

    Tau Vior'la (1.5 Developmental)

    FIRE WARRIOR CADRE [425]
    6 Fire Warrior Units, 3 Devilfishes, Shas'o Commander, Cadre Fireblade, Skyray

    FIRE WARRIOR CADRE [500]
    6 Fire Warrior Units, 3 Devilfishes, 2 Pathfinder units and 1 Devilfish or 3 pathfinder units, Cadre Fireblade, Ethereal, Skyray

    FIRE WARRIOR CADRE [250]
    6 Fire Warrior Units, 3 Devilfishes, Cadre Fireblade

    ARMOURED SUPPORT GROUP [225]
    4 Hammerhead Gunship (Railhead)

    ARMOURED SUPPORT GROUP [225]
    4 Hammerhead Gunship (Railhead)

    ARMOURED SUPPORT GROUP [225]
    4 Hammerhead Gunship (Railhead)

    RECON SKIMMER GROUP [150]
    Piranha, 4 Pathfinder Tetra

    RECON SKIMMER GROUP [150]
    5 Pathfinder Tetra

    RECON SKIMMER GROUP [150]
    5 Pathfinder Tetra

    RECON SKIMMER GROUP [150]
    5 Pathfinder Tetra

    XV104 RIPTIDE FORMATION [350]
    3 XV104 Riptides, Shas'el Commander

    SPACECRAFT [200]
    1 Protector Class Cruiser

    *********************************************************************************************************************

    Deployment

     Deployment

    ********************************************************************************************************************

    Turn 1

    • Tau Vior'la win SR and go first.
    • Tau Vior’la- Place FIRE WARRIOR CADRE (BTS) overwatch
    • Codex Astartes- Bring in thunderbolts (1K/2BM’s from AA fire) and shoot hammer heads, giving them a BM.
    • Tau Vior’la- Do coordinate fire and so move RECON SKIMMER GROUP 2 and shoot SCOUT, giving it a BM..The ARMOURED SUPPORT GROUP move up and shoots SCOUT, killing 1 and giving it 2 BM’s
    • Codex Astartes- Place Tactical on overwatch, near Blitz
    • Tau Vior’la- Double move ARMOURED SUPPORT GROUP…
    • Codex Astartes- March move Land Raiders up behind church
    • Tau Vior’la- Do marshalling ARMOURED SUPPORT GROUP, so move and remove BM’s
    • Codex Astartes- Bring in THUNDERHAWK&DEVASTATOR and do engagement and target the XV104 RIPTIDE FORMATION. The dice are rolled and the THUNDERHAWK&DEVASTATOR wins the combat and the XV104 RIPTIDE FORMATION is broken and flees forwards…
    • Tau Vior’la- Double move RECON SKIMMER GROUP 4..
    • Codex Astartes- Bring in THUNDERHAWK&DEVASTATOR and do engagement and target the broken XV104 RIPTIDE FORMATION. The dice are rolled and the THUNDERHAWK&DEVASTATOR wins the combat and the XV104 RIPTIDE FORMATION is wiped from the board…
    • Tau Vior’la- Use spacecraft (SC rerolled used) and after the smoke clears, 2 dead THUNDERHAWK
    • Codex Astartes- Keep scouts on overwatch in church..
    • Tau Vior’la- Do coordinate fire and so move RECON SKIMMER GROUP 1 and shoot DEVASTATOR, giving it a BM.The FIRE WARRIOR CADRE move up and shoots DEVASTATOR, killing 3 and so it breaks and flees back..
    • Codex Astartes- Keep scouts on overwatch
    • Tau Vior’la- Double move FIRE WARRIOR CADRE and shoot DEVASTATOR, killing 3 and so it breaks and flees back..
    • Tau Vior’la- Fail to activate RECON SKIMMER GROUP 3 and so takes BM and moves..
    • RALLY PHASE…Codex Astartes- Don’t rally DEVASTATOR and Don’t remove BM’s from scouts..

    END OF TURN SHOT

    End of turn 1

    ********************************************************************************************************************

    Turn 2

    • Tau Vior'la win SR and go first.
    • Tau Vior’la- Do coordinates fire and so move RECON SKIMMER GROUP 2 and shoots DEVASTATOR, giving it a BM. The FIRE WARRIOR CADRE move up and shoots DEVASTATOR, killing 1 and giving it 3 BM’s..
    • Codex Astartes-Do engagement with DEVASTATOR (Support DEVASTATOR) and target the FIRE WARRIOR CADRE. The dice are rolled and the FIRE WARRIOR CADRE wins the combat and the flees and the supporting DEVASTATOR, breaks due to BM’s and so flees forwards..
    • Tau Vior’la- Do sustains fire with ARMOURED SUPPORT GROUP and shoots DEVASTATOR, killing 1 and giving it 2 BM’s
    • Codex Astartes- Do Marshalling action with DEVASTATOR and so shoot the RECON SKIMMER GROUP 2, giving it a BM and then removes all BM’s…
    • Tau Vior’la- Double move RECON SKIMMER GROUP 1(Lose 1 to DTT and then 1 to OWF) and shoot Scouts, giving them a BM..
    • Codex Astartes- KEEP Tactical on overwatch..
    • Tau Vior’la- Double move ARMOURED SUPPORT GROUP and shoots scouts, giving it a BM
    • Codex Astartes- Move scouts and shoot RECON SKIMMER GROUP 1, it breaks due to BM’s and so flees back..
    • Tau Vior’la- Double move ARMOURED SUPPORT GROUP and shoots scouts (Church), giving it a BM
    • Tau Vior’la- Move RECON SKIMMER GROUP 3 and shoots broken DEVASTATOR, killing it outright..
    • Tau Vior’la- Double move FIRE WARRIOR CADRE to claim blitz
    • Tau Vior’la- Fail to activate RECON SKIMMER GROUP 4 and so does a hold action..
    • Codex Astartes- Bring in thunderbolts and shoots broken RECON SKIMMER GROUP 4, killing 1 all up
    • RALLY PHASE: Codex Astarte's: Don’t remove BM from DEVASTATOR

    END OF TURN SHOT

    end of turn 2

    ********************************************************************************************************************

    Turn 3

    • Codex Astarte's win SR and go first.
    • Codex Astartes- Do marshalling action with DEVASTATOR and so shoots RECON SKIMMER GROUP 2, giving it a BM and then removes BM’s
    • Codex Astartes- Do marshalling action with DEVASTATOR and so shoots RECON SKIMMER GROUP 2, giving it a BM and then removes BM’s
    • Tau Vior’la-Double move RECON SKIMMER GROUP 1 and shoot scouts in Building, giving it a BM..
    • Codex Astartes- Move scouts and shoots RECON SKIMMER GROUP 1. Killing 1 and breaking it, so it flees forwards..
    • Tau Vior’la- March move RECON SKIMMER GROUP 3, back to Blitz
    • Codex Astartes-Keep Tactical on overwatch
    • Tau Vior’la- Move ARMOURED SUPPORT GROUP and shoots scouts in building, giving them a BM
    • Codex Astartes- Marshal scout in building, so move and remove all BM’s.
    • Tau Vior’la- Do sustain with FIRE WARRIOR CADRE(SC Reroll) and shoots the DEVASTATOR, killing the formation out right
    • Codex Astartes- Move Land Raiders to be beside the church..
    • Tau Vior’la- Move FIRE WARRIOR CADRE and shoot DEVASTATOR, killing the formation out right
    • Codex Astartes- Codex Astartes- Bring in thunderbolts and shoot hammer heads, Killing 1 and giving them 2 BM’s.
    • Tau Vior’la- Double move RECON SKIMMER GROUP 1 and contest objective marker..
    • Tau Vior’la-Move (Basically hold) FIRE WARRIOR CADRE near Blitz..
    • Tau Vior’la-Move (Basically hold) ARMOURED SUPPORT GROUP near Objective marker..
    • Tau win 2-0
    Victory Condition Codex Astartes Tau Vior'la
    1. Blitz NO no
    2. Break their sprit NO NO
    3. Defend the Flag NO Yes
    4. Take and Hold No no
    5. They Shall not Pass NO Yes
    END OF TURN SHOT

    end of turn3 

    ********************************************************************************************************************

    Summary
     
    Thanks for the game Matt..most enjoyable.
     
     
    Regards
    Greg

    Friday, September 30, 2016

    Legio Gryphonicus (NetEA v3.24 *APPROVED*) and Tau Vior'la (1.5 Developmental)

    Well we manage another game of epic. It was 3000 point per side and it was between Legio Gryphonicus (NetEA v3.24 *APPROVED*) and Tau Vior'la (1.5 Developmental)

    Mathew played the Tau Vior'la (1.5 Developmental) and I played the Legio Gryphonicus (NetEA v3.24 *APPROVED*)

    ********************************************************************************************************************

    Armies used

    Legio Gryphonicus (NetEA v3.24 *APPROVED*)

    REAVER TITAN [875] Carapace Landing Pad, 2 Quake Cannon, Legate, Carapace Multi-Lasers, Sacred Icon

    REAVER TITAN [700] Carapace Landing Pad, Veteran Princeps, 2 Apocalypse Missile Launcher, Carapace Multi-Lasers

    REAVER TITAN [825] Veteran Princeps, 3 Melta Cannon, Single Weapon System Surcharge, Carapace Multi-Lasers

    WARHOUND TITAN [300] Plasma Blastgun, Vulcan Megabolter, Veteran Princeps

    WARHOUND TITAN [300] Inferno Gun, Veteran Princeps, Plasma Blastgun

    TITAN FORCE

    Tau Vior'la (1.5 Developmental)

    FIRE WARRIOR CADRE [325]
    6 Fire Warrior Units, 3 Devilfishes, Shas'o Commander
    FIRE WARRIOR CADRE [375]
    6 Fire Warrior Units, 3 Devilfishes, 2 Pathfinder units and 1 Devilfish or 3 pathfinder units, Ethereal
    FIRE WARRIOR CADRE [325]
    6 Fire Warrior Units, 3 Devilfishes, 2 Pathfinder units and 1 Devilfish or 3 pathfinder units
    FIRE WARRIOR CADRE [225]
    6 Fire Warrior Units, 3 Devilfishes
    ARMOURED SUPPORT GROUP [225]
    4 Hammerhead Gunship (Railhead)
    ARMOURED SUPPORT GROUP [225]
    4 Hammerhead Gunship (Railhead)
    ARMOURED SUPPORT GROUP [225]
    4 Hammerhead Gunship (Railhead)
    ARMOURED SUPPORT GROUP [225]
    4 Hammerhead Gunship (Railhead)
    SKYSWEEP SUPPORT GROUP [250]
    3 Skyray Air Defense Gunships
    RECON SKIMMER GROUP [150]
    5 Pathfinder Tetra
    RECON SKIMMER GROUP [150]
    5 Pathfinder Tetra
    RECON SKIMMER GROUP [150]
    5 Pathfinder Tetra
    RECON SKIMMER GROUP [150]
    5 Pathfinder Tetra

    *********************************************************************************************************************

    Deployment

    • Deployment of Legio Gryphonicus,Tau Vior'la and objective markers..

    Deployment

    ********************************************************************************************************************

    Turn 1

    • Legio Gryphonicus win SR and make Tau Vior'la go first..
    • Tau Vior'la do coordinate fire and so move RECON SKIMMER GROUP 2 and shoot REAVER TITAN, giving it a BM..The ARMOURED SUPPORT GROUP move up and shoots REAVER TITAN, taking four shields down, giving it a BM..The ARMOURED SUPPORT GROUP double moves and shoots REAVER TITAN, doing a DC and confirming a Critical and giving it 2 BM’s..
    • Tau Vior'la do coordinate fire(SC reroll used) and so move FIRE WARRIOR CADRE and shoot REAVER TITAN, doing a DC and breaking it due to BM’s, so it flees and takes another DC due to failed DTT....The ARMOURED SUPPORT GROUP double moves and shoots broken REAVER TITAN, doing nothing...FIRE WARRIOR CADRE double moves..
    • Legio Gryphonicus move REAVER TITAN, and fire indirect and shoot the  FIRE WARRIOR CADRE , killing two and giving it 4 BM’s
    • Legio Gryphonicus move WARHOUND TITAN, and shoots ARMOURED SUPPORT GROUP, killing 3 and breaking the formation. So it flees back.

    Turn1part1

    • Tau Vior'la double move SKYSWEEP SUPPORT GROUP and shoot WARHOUND TITAN,taking a shield down and giving it a BM..
    • Legio Gryphonicus double move REAVER TITAN, and fire indirect and shoot the RECON SKIMMER GROUP 1, killing Two and breaking the formation, which flees.
    • Tau Vior'la fail to activate ARMOURED SUPPORT GROUP, so take BM and shoots WARHOUND TITAN, taking a shield down and giving it a BM..
    • Legio Gryphonicus double move WARHOUND TITAN, into woods..

    turn1part2

    • Tau Vior'la march move RECON SKIMMER GROUP 4..
    • Tau Vior'la double move RECON SKIMMER GROUP 4..
    • Tau Vior'la double move FIRE WARRIOR CADRE and shoot WARHOUND TITAN, giving it a BM.
    • Tau Vior'la march move FIRE WARRIOR CADRE.

    turn1part3

    • REAVER TITAN suffers another DC and then suffers another critical due extra DC.
    • Tau Vior'la don’t remove BM’s from FIRE WARRIOR CADRE..

    END OF TURN SHOT

    end of turn1

    ********************************************************************************************************************

    Turn 2

    • Legio Gryphonicus win SR and go first..
    • Legio Gryphonicus do sustain fire with REAVER TITAN,and shoot the ARMOURED SUPPORT GROUP and clipping RECON SKIMMER GROUP 2. The ARMOURED SUPPORT GROUP loses two and breaks and flees.The RECON SKIMMER GROUP 2 loses 1 and gets 3 BM’s.
    • Legio Gryphonicus do engage action with WARHOUND TITAN and target the RECON SKIMMER GROUP 2.The dice are rolled and the WARHOUND TITAN wins the combat and the RECON SKIMMER GROUP 2 is broken. The WARHOUND TITAN stays put and the RECON SKIMMER GROUP 2 flee.
    • Tau Vior'la do coordinate fire and so move RECON SKIMMER GROUP 1 and shoot WARHOUND TITAN, giving it a BM..The ARMOURED SUPPORT GROUP does sustain fire and shoots WARHOUND TITAN, killing it outright..The FIRE WARRIOR CADRE, hold.
    • Tau Vior'la do coordinate fire and so move FIRE WARRIOR CADRE and shoot WARHOUND TITAN, giving it a BM..The ARMOURED SUPPORT GROUP does sustain fire and shoots WARHOUND TITAN, taking two shields down and breaking it due to BM’s

    Turn2part1

    • Legio Gryphonicus do engage action with REAVER TITAN and target the RECON SKIMMER GROUP 4.The dice are rolled and the REAVER TITAN wins the combat and the RECON SKIMMER GROUP 4 is wiped from the board. The REAVER TITAN stays put..
    • Tau Vior'la double move RECON SKIMMER GROUP 3..
    • Tau Vior'la do sustain fire with FIRE WARRIOR CADRE and shoot Broken WARHOUND TITAN, doing nothing.
    • Tau Vior'la do sustain fire with FIRE WARRIOR CADRE and shoot Broken WARHOUND TITAN, doing nothing.

    Turn2part2

    • Tau Vior'la do sustain fire with FIRE WARRIOR CADRE and shoot Broken WARHOUND TITAN, doing nothing.
    • Tau Vior'la double move ARMOURED SUPPORT GROUP and shoots broken REAVER TITAN, killing it out right.
    • Tau Vior'la fail to activate ARMOURED SUPPORT GROUP, breaks due to BM’s and flees.

    Turn2part3

    • Tau Vior'la don’t rally 2x ARMOURED SUPPORT GROUP and RECON SKIMMER GROUP 2..Tau Vior'la don’t remove BM’s from FIRE WARRIOR CADRE..

    END OF TURN SHOT

    end of turn 2

    ********************************************************************************************************************

    Turn 3

    • Tau Vior'la win SR and go first..
    • Tau Vior'la fail to activate FIRE WARRIOR CADRE(SC reroll used).Takes BM and shoots WARHOUND TITAN, taking shield down and giving it a BM..
    • Legio Gryphonicus move REAVER TITAN, and fire indirect and shoot the FIRE WARRIOR CADRE, killing 3 and giving it 6 BM’s..
    • Legio Gryphonicus do engage action with WARHOUND TITAN and target the RECON SKIMMER GROUP 1, calls intermingled and drags in the ARMOURED SUPPORT GROUP.The dice are rolled and the RECON SKIMMER GROUP 1&ARMOURED SUPPORT GROUP wins the combat and the WARHOUND TITAN is broken and stays put.
    • Tau Vior'la double move RECON SKIMMER GROUP 3 and shoots REAVER TITAN, giving it a BM..

    Turn3part1

    • Legio Gryphonicus do sustain fire with REAVER TITAN,and shoot the RECON SKIMMER GROUP 3, killing 1 and giving it 3 BM’s.
    • Tau Vior'la fail to activate FIRE WARRIOR CADRE, so move and take BM..
    • Tau Vior'la do sustain fire with SKYSWEEP SUPPORT GROUP and shoot REAVER TITAN, taking a shield down and giving it a BM.
    • Tau Vior'la double move ARMOURED SUPPORT GROUP(1 lost to DTT) and shoots REAVER TITAN,taking down 3 shields and giving it a BM.

    turn3part2

    • Tau Vior'la double move ARMOURED SUPPORT GROUP and shoots REAVER TITAN, doing a DC and breaking the formation due to BM’s.
    • Tau Vior'la do sustain fire with FIRE WARRIOR CADRE and shoot Broken REAVER TITAN, doing nothing.
    • Tau Vior'la do sustain fire with FIRE WARRIOR CADRE and shoot Broken REAVER TITAN, doing nothing.
    •  Tau Vior'la don’t rally RECON SKIMMER GROUP 2..Tau Vior'la don’t remove BM’s from 2xFIRE WARRIOR CADRE..
    •  Tau Vior'la win 2-0
    Victory Condition Legio Gryphonicus Tau Vior'la
    1. Blitz NO Yes
    2. Break their sprit NO NO
    3. Defend the Flag NO no
    4. Take and Hold No Yes
    5. They Shall not Pass NO no
    END OF TURN SHOT

     end of turn 3

    ********************************************************************************************************************

    Summary
     
    Well I knew, before we started it was not going to be a win.But hey it was still fun to fight and in some parts I was grinning from ear to ear. Although some of the dice rolling was well, not as funny..Two engagements needing 4+ and not getting a single hit..
     
    Thanks for the game Mathew
     
     
    Regards
    Greg