Sunday, January 18, 2009

"Surgical Strike" FWC scenario...18 Jan 08

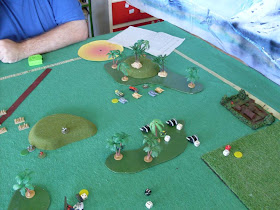
James, Greg, Trent, & Britt assembled at Innes Park for our usual Sunday FWC game. Greg wanted to try the "Surgical Strike" scenario, so I'd set up the table and let him decide on which side he wanted to play and which edge he wanted if the attacker. He chose to have the Marines be the attacker and come in on the East (short) edge.(see photo, looking west). The 4 objectives were the "Deep Space Communications Tower" in the heart of East City, The Fighter Base/hanger to the south, The Ion Cannon on Cannon Hill north of it, and the "Colonial Administration Building", the largest building in West City.


Marines (Greg & Trent).
1 CO (CV10)
2 HQ (CV9)
2 FAC (CV9)
2 Recce Unit (M4A2 All-Terrain Bike)
8 Infantry Unit (Regular Marines)
4 IFV Unit (M50 'Bad Dawg')
8 IFV Unit (M1 'Big Mama' Assault Vehicle)
2 Walker Unit (M1A5 'Coyote')
8 Artillery Unit (M1 Missile System)

Red Guard (James & Britt)
1 CO (CV 8)
4 HQ (CV 7)
2 FAO (CV 8)
12 Conscript Infantry
6 Red Lance Artillery
2 Red Scouts
14 T-990 MBT 'Leman Russ'
12 T-792S 'Siegfried' Lt. Tanks

Deployment: The Red Guard had 12 Conscript Infantry, 1 FAO, 2 HQ's and a Scout deployed on the objectives, generally 3 Conscripts to an objective.

TURN 1. Trent came in on the NE board edge with 4 Big M's and a Scout Bike. The rest failing to arrive. Greg gets 2 Rhinos (Bad Dawg), 4 Big M's, and a Recce Bike on the SE edge. . The Red Guard seem to have been at a political meeting watching "Inspirational Media", thus failing to spot the invaders.


TURN 2. Trent moves his scout bike 5 moves forward toward "Cannon Hill". Next he moves his Rhinos around the NE wood to near the central wood.
Greg brings on his 2 Coyote Walkers. These move forward as do his Rhino's and Big M's to just short of East City and its Commo Tower. They're spotted!! Alarms ring out, orders are quickly given, and the sound of running feet can be heard everywhere in the city.


TURN 3. Trent: Rhinos move north of "Cannon Hill" and deploy. Op fire from defending Conscripts does little damage. Marines charge uphill at the Ion Cannon's defenders, who first score a few hits on them, then amazingly defeat them in hand-to-hand combat! Two Marine squads lie bleeding on the ground while the rest retreat. Shouts of "Long Live Chairman Smirnoff" can be heard. But the victory is short lived, and 4 Big M's now move up, shooting at the Cannons defenders, killing 2 of the 3 defending squads.
Greg deploys 4 Marine units onto the SE edge of East City from their Rhinos.. His Big M's now move toward the Fighter Base, being between it and East City.
James RG Artillery (30D worth) hits the advancing Big M's. 5 hits but no kills. He moves some infantry toward East City. The Reserve of 12 Light Tanks is committed to the West on East City.


TURN 4. Trent : Marine Artillery kills the last Conscript defender on Cannon Hill and the way to the Ion Cannon is now clear. Greg: A Marine Assault by 2 Rhinos & passengers on the Commo Tower kills 1 Conscript, but the defenders are tenacious.
James: Artillery roll fails, a critical loss. Defenders told to hold at all cost. Britt: The RG Light Tanks open up at short range on the Big M's. They kill 1 and suppress 2. At last, the 14 MBT's arrive and make a double move to the runway!


TURN 5. Greg's artillery kills 1 Lt. Tank and a RG FAO. His second artillery roll fails. Rhinos just outside East City fail to move while the 2 "Coyotes" return to their assault drophip. ??? Trent has a bad run of Command rolls.
James: Also fails his Artillery roll. Gunners out for Bosch & vodka? The Light Tanks continue to fire, suppressing 1 Big M and killing another. The main MBT forces remains halted at the runway.


TURN 6. Trent: Marines move onto the Ion Cannon and plant their charges! This causes a Reactor explosion which kills the 2 Marine Units inside, and suppressing several friends & foes outside. The Ion Cannon is destroyed. A new artillery barrage on the RG Light Tanks kills 1 and suppresses 2 others. Greg: Greg's artillery descends upon the hapless Lt. Tanks. This kills 2 and a Scout, then he opens up with his Big M's to kill 3 of the survivors of the artillery as well as 1 HQ.


TURN 7. Trent begins his withdrawal. 4 Big M's leave and numerous HQ's and FAO are in full retreat. Artillery damages 3 Lt. Tanks. Greg's last remaining infantry enters the Deep Space Commo Tower and plants its charges. A second move and it's BOOM!
While the attacker has exceeded its Break point, he has accomplished his mission! There is no way the Red Guard can kill over 5 of the retreating Marine units, so they'll all make it off board next turn, allowing him to double his victory points to 8 compared to the Red Guards 4. VICTORY TO THE MARINES. They earned it!


Well another four hours killed near the beach, nice hot sunny day. Aways keep safe. Thanks Britt for doing the write up.
cheers
Greg

Thursday, January 15, 2009

Well the Trynids have all been rebased and now all i have to do is paint the bases and some touch ups on figures. This is likely to take me all week, since it the temp is going to hit 35 degrees and higher. so I'm hoping to have pictures up by the end of the month if all goes well.

Monday, January 12, 2009

Tyranids

I have manage to start to rebase my Tyrnids today and I look forward is showing some of the finish stands in a couple of days if all goes well. This well depend on how things go tommorrow since i have appoinments

Sunday, January 11, 2009

Sunday FWC Game...11 Jan 09

Well a another game of FWC after having three weeks off for the X-mas Break etc. So as before Britt has written the report and i have taken the pic's. I believe this game was the best one yet since you had to think about your moves etc because of the terrain on the table

Greg, Trent, James, & I got together for our usual Sunday game of Future War Commander. The forces were about the same as a few weeks back:
Space Marines: (Greg & Trent)
1 CO (CV10)
2 HQ (CV9)
2 FAO (CV9)
2 Recce Unit (M4A2 All-Terrain Bike)
8 Infantry Unit (Regular Marines)
4 IFV Unit (M50 'Bad Dawg')
8 IFV Unit (M1 'Big Mama' Assault Vehicle)
2 Walker Unit (M1A5 'Coyote')
8 Artillery Unit (M1 Missile System)

Red Guard: (James)
1 CO (CV8)
2 HQ (CV7)
1 FAO (CV8)
8 Conscripts
3 Red Lance Artillery
2 T-990V
4 T-990 MBTs
4 T-855 APCs
4 Lt. Tanks


North American Combine:(Britt)
1 CO (CV9)
2 HQ (CV8)
2 FAO (CV7)
4 Combine Inf.
6 Banshee SPAT
8 Yankee Lt. Tanks
3 Minotaur Arty
2 Scout Recce Inf

The terrain was vastly different (see photo). A full 1/4 of the table (4' x 6') was covered by cropfields, hills, woods, Mag-Lev train embankment, or Urban. Its amazing how much this improved the game, and we all agreed that we'd retain this in future games.
After deployment, the Marines won the toss and moved out first(AS BELOW).


TURN 1: Trent (north west table edge) moves his Landraiders twice into the cropfield & Jungle to his front, and his Rhinos 30cm to behind a hill. Greg(Northeast edge) moved his Land Raiders (Big M's) to the Mag-Lev rail embankment, then into the city while his Rhinos move to just short of the city. His 2 Coyote's move just short of the jungle in the centre. (He also derailed the train, but thats another story).
Britt(Southeast edge) moved his NAC Banshee Missile Tanks to the hill to the east, where they can see one of the Coyotes. Fire ripples from the Banshees and the giant Walker slowly tumbles to the ground. NAC light tanks move up between the jungles. James (southwest) moves his conscripts up (they're none too eager) and light tanks into the table centre. The Leman Russ squadron moves up, killing a Recce in the woods and a Big M in the cropfield.
QUOTE: " More terrain is already important. People are thinking instead of just lining up & shooting" Greg.


TURN 2: Trent moves up his Big M's and damages some Leman Russ tanks, but Op fire in reply suppresses 2 of them. Whirlwind artillery fire kills 2 Red Guard light tanks and supresses others. Greg's artillery drifts badly, killing only 1 NAC light tank but defoliating an entire section of Jungle! The mass of artiillery falling around them probably caused the other light tankers nearby to need a change of underwear! The Coyote receives a command blunder, but this causes it to melee with a damaged Red Guard Lt. Tank and destroy it.
With unheard of luck on my part, I (Britt) cross the Mag-Lev embankment with (most) of my Banshee Tanks and fire on the 2 Rhinos sheltering there behind the city. Both Rhinos are destroyed as well as 2 of the 4 marine unit passengers. NAC Lt. Tanks move into the city to confront the Big M's. but fail to fire. NAC Artillery fails to respond.("Everyones on Smoko right now mate. Can you call back in half an hour?"). James conscripts move slightly forward. They really aren't interested in being heroes. His artillery kills a Big M in the jungle as well as its HQ. His light tanks attack the Coyote (with its shields down due to the assault earlier). Op fire suppresses one, but they kill the Coyote.


TURN 3: Trent had some bad luck, with no commands going to either his artillery or Big M's. Greg rained death upon the Red Guard infantry in the open. First Orbital bombardment and then off-board artillery kills 6 units. It looks grim for the NAC Lt. Tanks in the city as the Big M's roll up to face them tread to tread, but the command roll to fire fails (2nd underwear change for the Lt. Tankers). Surviving infantry move toward the Banshees, who have no answer to this threat. Rhinos move from behind the hill to forward into the jungle, but fail to dismount.
NAC Banshees move west trying to find a target. Lt tank fire on Big M's in city is ineffective. Artillery fire on 2 Rhinos in the jungle does damage, but no kills. James artillery hits Trents Big M & HQ, which they supress. Leman Russ tanks kill the Big M.


TURN 4: Trents artillery salvo misses the recon robot he was aiming at and drifts into the Leman Russ squadron. This kills the FAO and supresses several tanks.. Greg's Big M's open up on the NAC Lt. Tanks. He kills one, supresses 1, and drives another back.
I move my Banshees toward the centre but can't fire. My Lt. Tanks leave the city to the Marines and look for easier "meat". They head for the Rhinos in the central jungle, but fail to fire. . James finishes off the Rhinos in the jungle and 2 infantry passengers.
This pushes the Marines over their morale limit. While the fight could continue if the Marines continue to make their CV roll, we decided to call it quits there as the Allies weren't that near breakpoint. The Allies allow the Marines to withdraw to their transports unhendered, just happy to be alive.


(My cat "Patches" helps us out by laying down on top of the 8 Marine Artillery units. I'll have to change her name from 'soft cover' to 'furry death'.).


10:50 leaving the station

This was easily our best game yet! (We've done about 14 now). More terrain definitely improves the game vastly. There seems to be much more manoeuvering, using terrain to advantage, using recce, trying to get flank shots, less long range firing, and better use of "short legged" troops. All for the good!

Regards
Greg